Follow my journey as I learn to cook and experiment in the kitchen!
About Me

I am a junior Public Relations college student who is trying to learn how to cook, despite having no previous experience. My goal is to show that anyone can learn to cook, even if they have little or no experience behind the stove. Being a full-time college student working two jobs, cooking has often fallen to the background given my busy schedule. However, I have always been curious about the process of making food and experimenting with flavors. The meaning behind cooking has always held a soft spot in my heart. Growing up, I loved to watch my family spend time in the kitchen but unfortunately have always been too afraid to try it for myself. After three years of having enough dining hall dishes and microwavable ramen, I have begun to educate myself on how to make different types of meals. This semester, I have finally decided to begin my journey into the kitchen. After searching on different cooking blogs and websites such as Pinterest, I have found a collection of recipes that I hope to try over the next couple of months. With the help and emotional support of my roommates, I will cook dinner multiple times a week with the hopes to never repeat a meal. I am blogging my process as I go from a cooking newbie to (hopefully) a self-sufficient chef!
Mastering the Art of Boiling Chicken
As I started my journey into cooking, I set personal goals for myself. For the first goal, I decided I wanted master cooking the most commonly eaten bird: chicken. A popular food among college students, chicken is a healthy and relatively less-expensive option for meat. What I love about chicken is how versatile the meat can be, making it an essential to learn to cook.
Starting as a novice cook, I felt the most nervous about cooking meats, mostly because when meat is undercooked it can make you pretty sick. In general, chicken should be cooked to at least 165 degrees in order to ensure it is well-done. In this blog, I will outline my favorite way to cook chicken breasts by boiling them on the stove.
Boiling the Chicken Breast:
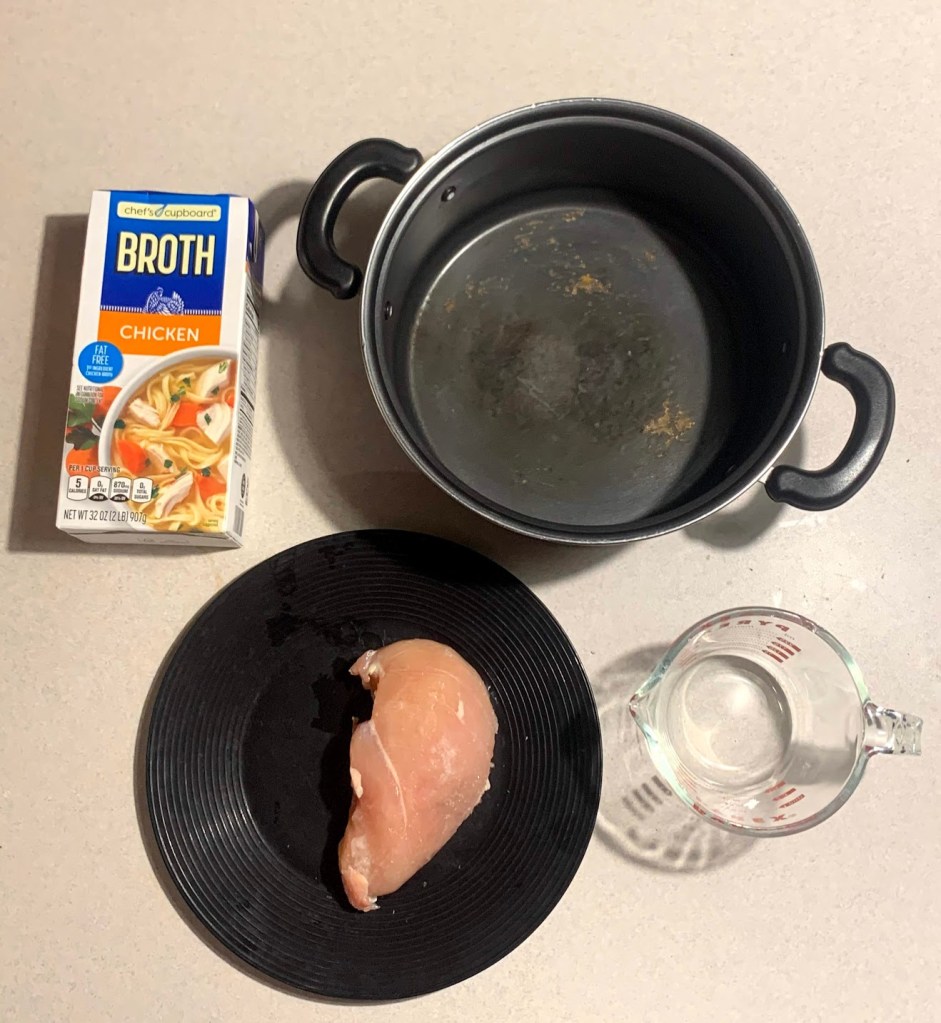
One technique I use to ensure well-cooked chicken every time is to boil the chicken breast. This may sound strange, but it is a quick and easy way to cook the meat, especially if you are a beginner chef like myself.
In general, I personally prefer cooking chicken breasts rather than other forms of the meat. However, boiling chicken with the bone in can work as well. I usually purchase my chicken breasts from Giant Food Stores.
- To start, use a large pot big enough to fit at least one chicken breast in it. Then take the chicken breast and cover it in salt and pepper for flavoring.
- After placing the pot on the stove, place the seasoned chicken breast at the bottom of the pot.
- Then use a measuring cup to pour in 1 cup of chicken stock (or enough to cover half of the chicken breast.) Alternatively, you can use water to boil the meat in, but I personally prefer using chicken stock or both because it can provide more flavor.
- Once covered with liquid, turn the stove to a medium heat and cover the pot with a lid.
- After the liquid comes to a boil, set a timer for eight minutes. Once the timer is done, use a meat thermometer to check the temperature thickest part of the chicken. If it is not cooked completely, the chicken can continue to boil for a couple more minutes. If the meat has reached 165 degrees, it can be taken off the stove to cool.
- Once cooled, the chicken can be devoured or put aside as part of another recipe.
After the chicken is done, it can be eaten alone or used in a variety of meals. Although cooking meat can be initially anxiety-inducing, cooking chicken can be as easy as boiling water!
The Joy of Sharing Home-cooked Chicken Tetrazzini

One of the main aspects that inspired me to learn to cook was to be able to share my food with friends and family. Many of my greatest childhood memories come from different members of my family cooking in the kitchen and being able to spend time together over food. Shared meals give opportunities for bonding and conversations with loved ones.
One of my goals, when I decided to learn to cook, was to be able to recreate some of the dishes that solidified certain memories in order to relive some events with family members.
Growing up, one of my favorite experiences was spending time at my grandmother’s house. Due to early retirement, my Grammy was able to watch me during the day while my parents worked. This created many opportunities for bonding and allowed me to appreciate my time with her.
Many of my greatest memories of my Grammy involve her unique dishes. Each day she would cook various meals from scratch and allow me to be her taste-tester. My favorite meal that she made for me growing up was her version of chicken tetrazzini.
Based on the magic eating this casserole gave me when I was young, I knew this was one of the first big dishes I had wanted to try to make. I was especially inspired to capture the joy that she gave me when she cooked this meal when I was a child.
I decided I wanted to cook my roommates this dish. This would allow me to share with them one of my favorite dishes and share with them a bit of my family.
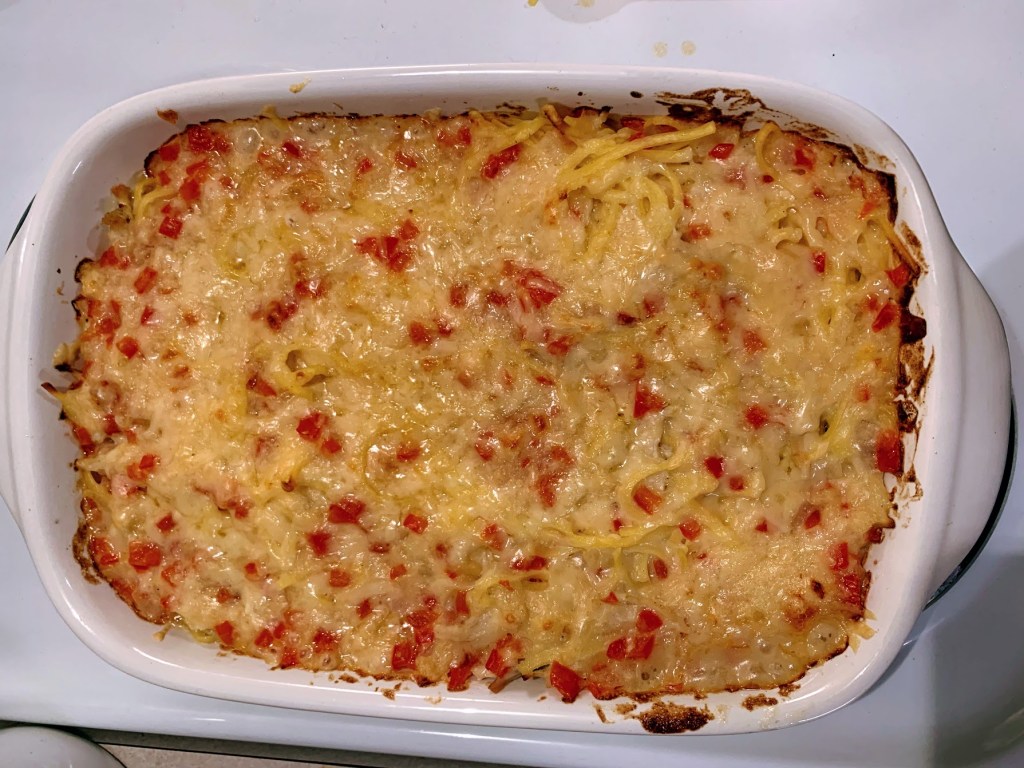
A baked casserole, this dish involves shredded chicken, parmesan cheese, noodles and red peppers. All are mixed together to create a large dish that can be served hot or cold.
To start, I knew I needed to reach out to her and get the recipe for the meal. The recipe is the most important part of the dish and can make or break some meals. Serving as a map for meals, the recipe provides all the important details for any dish.
Handwritten on a notecard, my grandmother’s recipe for chicken tetrazzini was developed over years of cooking this meal for her six children. Her recipe for the chicken tetrazzini was meant to make eight servings and can stand alone without any side dishes. It is known to be very filling based on its rich ingredients. However, dairy-free individuals beware as this dish involves whole milk, cheese and half and half.
Ingredients:
- ½ of a box of spaghetti
- 2 chicken breasts cooked and shredded
- ½ cup of butter
- 1 cup of red pepper, chopped finely
- ½ cup of onion, chopped finely
- ¼ cup of flour
- 2 cups of half and half
- 1 cup of chicken broth
- 1/3 cup of milk
- ½ cup of parmesan cheese
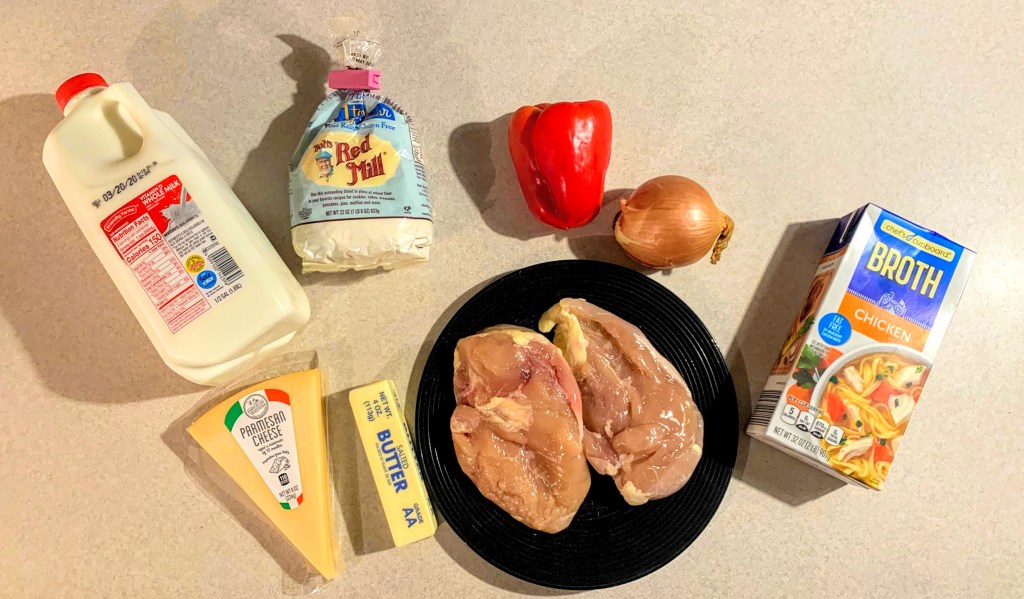
For this recipe, I bought all my ingredients from Aldi Grocery Store and Giant Food Store.
Recipe:
- To begin cooking the chicken tetrazzini, you must start by cooking the chicken. In order to have moist chicken ready for shredding, I like to boil the chicken to cook it. After it is cooked, shred the chicken and set it to the side.
- Next is the pasta. The recipe calls for spaghetti noodles, but I have used fettuccini noodles in the past and that has worked fine. To cook the pasta, boil water on the stove and allow the noodles to boil until they are tender. Once they are tender, drain the noodles and set them aside.
- Chop up the peppers and onions. Then you will sauté them together with butter making sure they are crispy. I often wait until they start to smell really strong and look slightly golden. Once the veggies are golden looking you will add in the ¼ cup of flour, slowly. You want to gradually add it to avoid making chunks.
- Slowly you will add in the two cups of milk and two cups of chicken broth, allowing the mixture to get thick.
- Once everything is cooked, you will place the noodles and the chicken in a 3-quart sized pan. It is important to make sure the pan can go into the oven. If not, a fire could happen! Coat the noodles with the liquidly mixture.
- Finally, you will cover the dish with parmesan cheese and place it in the oven at 350 degrees for 25 minutes.
- Once the dish is hot and bubbly, it is ready to be devoured (just make sure it cools first).
One of the most rewarding parts of going on my cooking journey has been the ability to share my food with other people. In general, homecooked meals can be a wonderful way to show people how much you care about them.
After cooking this chicken tetrazzini dish, I was reminded of how important sharing food is for relationships. Being able to make a dish that my roommates were able to enjoy with me put me in a better mood and reminded me of the bonding my grandmother and I had when I was young. This solidified how food can create magic in and outside the kitchen.

Restaurant-Quality Thai Iced Tea from Home
Being a college kid, I always looking for ways to save money. There are so many restaurants and cafes that I enjoy going to, but I know I should avoid in order to save a little money. However, I do think that you should enjoy a little treat occasionally.
Thai food is one of my weaknesses when it comes to eating out. However, my favorite item to order at Thai restaurants is not always the food. Thai iced tea is a common beverage that can be found at many different restaurants, including Thai and Vietnamese. In recent years, I have also found that Thai tea is a popular flavor for bubble teas, a trendy drink that features Boba.
As much as I enjoy drinking Thai iced tea, it is not always easy to get and with each glass costing $3.00 it can get expensive.
During my quest to learn to cook, I knew I wanted to be able to replicate my favorite drink while at home. This would allow me to enjoy Thai iced tea whenever I wanted and also save me some extra money.
Making Thai Iced Tea at Home:
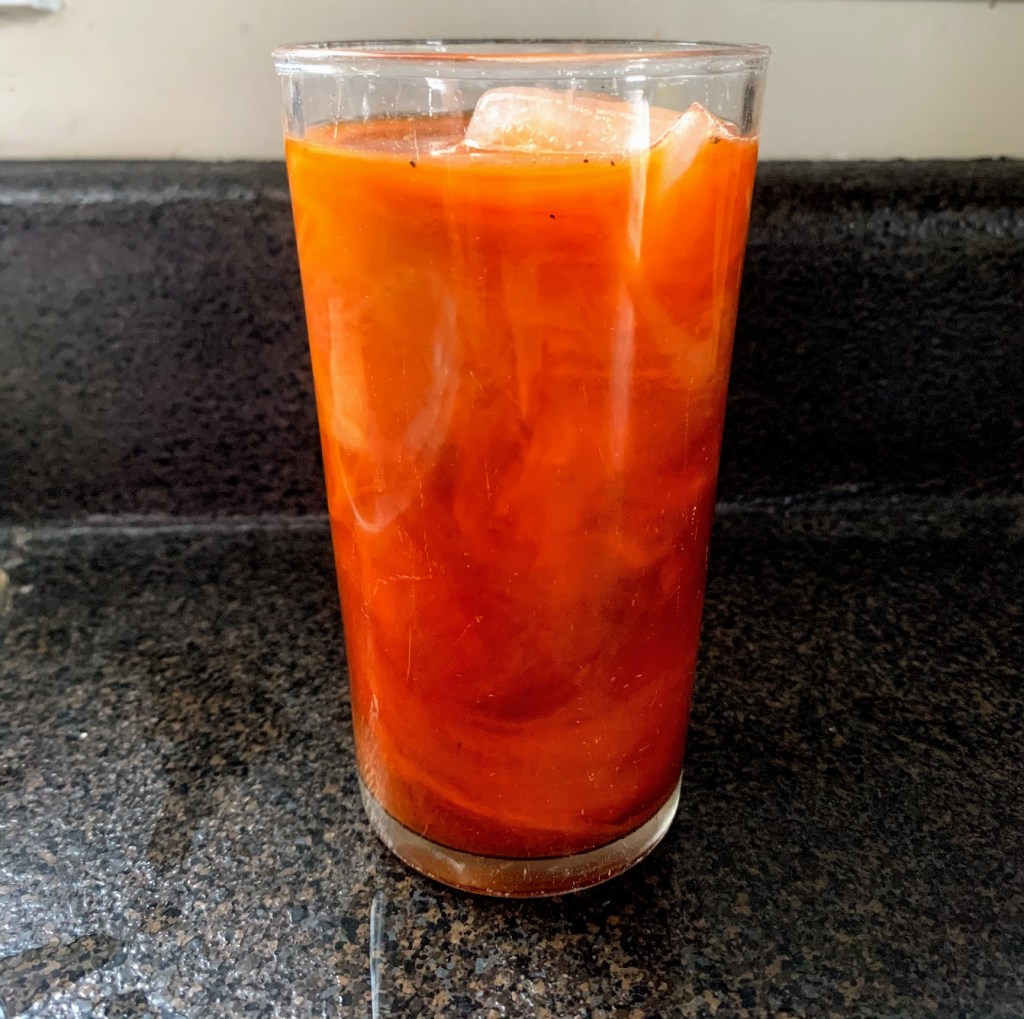
Thai iced tea only requires 3 different ingredients. In order to have authentic quality Thai iced tea, I reached out to a Vietnamese friend and found the tea leaves that they use. For this recipe I used Number One Original Thai Iced Tea Leaves.
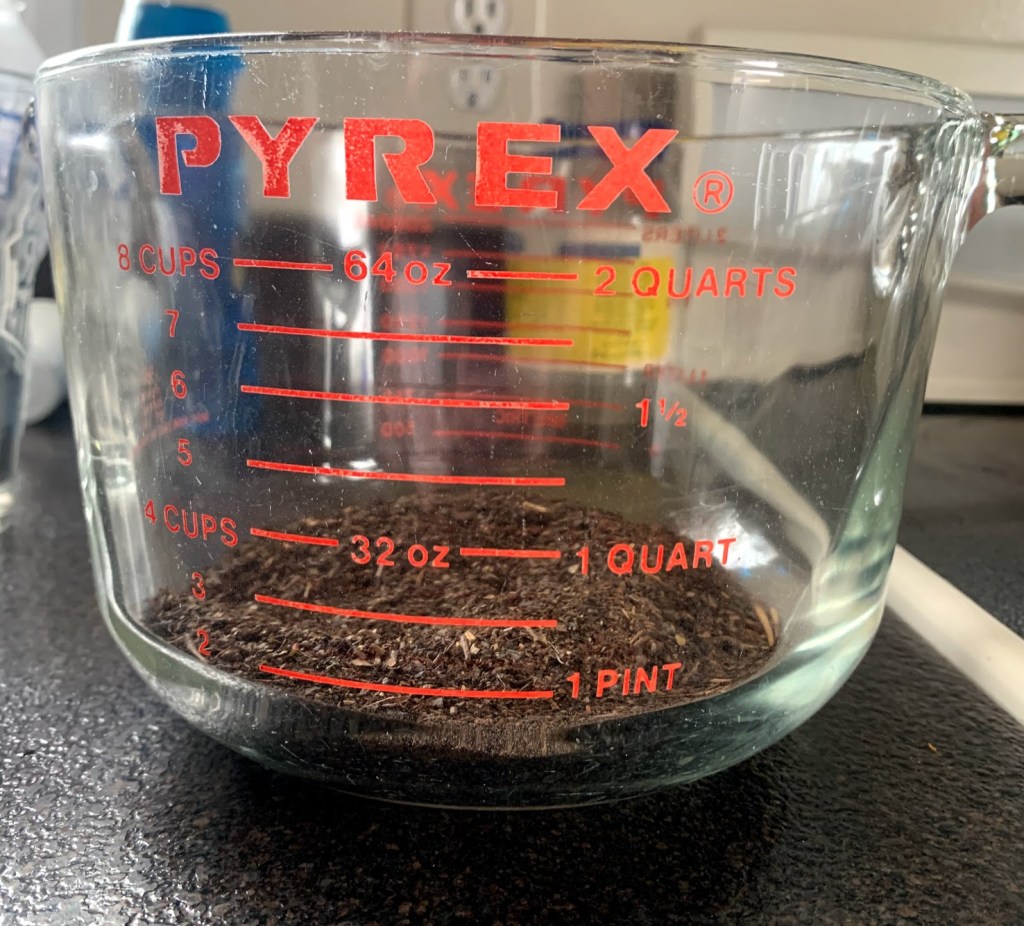
- To start I measure out one cup of the tea leaves and place it into a large Pyrex glass measuring cup. It is important to use a container that can hold hot liquids as you do not want to melt or ruin any of your dishes. I use Pyrex containers because they are known to be able to withstand heat.
- Once the tea is measured, boil six cups of water using a kettle. Once the water is boiled, add the liquid to the container that is holding the tea leaves. Set a timer for 45 minutes because the longer the tea brews, the more flavorful it will be.
- While the tea is brewing, add ¾ to one cup of white sugar to the liquid. Make sure to stir the sugar in so it becomes completely dissolved.
- Once the tea has cooled, use a strainer to remove any of the loose leaves. Pour the tea over ice and add whatever your preference of milk is on top. I personally use sweetened almond milk as I am lactose intolerant.
By following these easy steps, being able to enjoy restaurant-quality Thai iced tea has never been easier.
Everything Bagel Chicken (Minus the Bagel!)
Who doesn’t love everything bagels? They are fluffy balls of dough are covered with savory seasonings and are perfect on their own or by being the bread for a sandwich. I have always enjoyed everything bagels because of their texture. Although it can get messy while eating, the most unique thing about the everything bagel is the seasoning that tops it. It is comprised of poppy seeds, regular and black sesame seeds, dried garlic, dried onion and salt. The different types of seeds on the bagel allows for a crunch and bold flavor with every bite.
As I worked through my cooking journey, I knew that I wanted to experiment with the spices and textures of my food. I remembered that everything bagel seasoning was available to top any type of meal and available to purchase on its own. This blend of seeds and seasonings represents the same flavors of the bagel without all the carbs. After purchasing a large container of everything bagel seasoning, I knew that I was going to make it a staple in my kitchen.
Everything bagel seasoning is extremely versatile and can be used on a variety of meals for breakfast, lunch and dinner. In the past, I have tried it and found that it goes well on avocado toast, popcorn and even different types of wet salads such as chicken, tuna or egg salad. This spice is a must-have for all kitchens and can be easily found a local retailer Trader Joe’s or on Amazon. I found a large container for under $11, proving this spice will not break the bank.
One of the first meals I decided to try to make with the everything bagel seasoning was everything bagel chicken tenders, inspired by a recipe my mom has made. Growing up, we often had chicken covered in panko seasoning to add a bit crunch. I assumed with my everything bagel seasoning, I could add that same interesting texture that panko chicken has but with a different bold mix of flavor.
I decided instead of making large chicken breasts covered in the seasoning, I would make chicken nugget style so I could split them into more servings and feed more people. However, this recipe will work with any variety of skinless and boneless chicken, including chicken breast, tenderloins and nuggets.
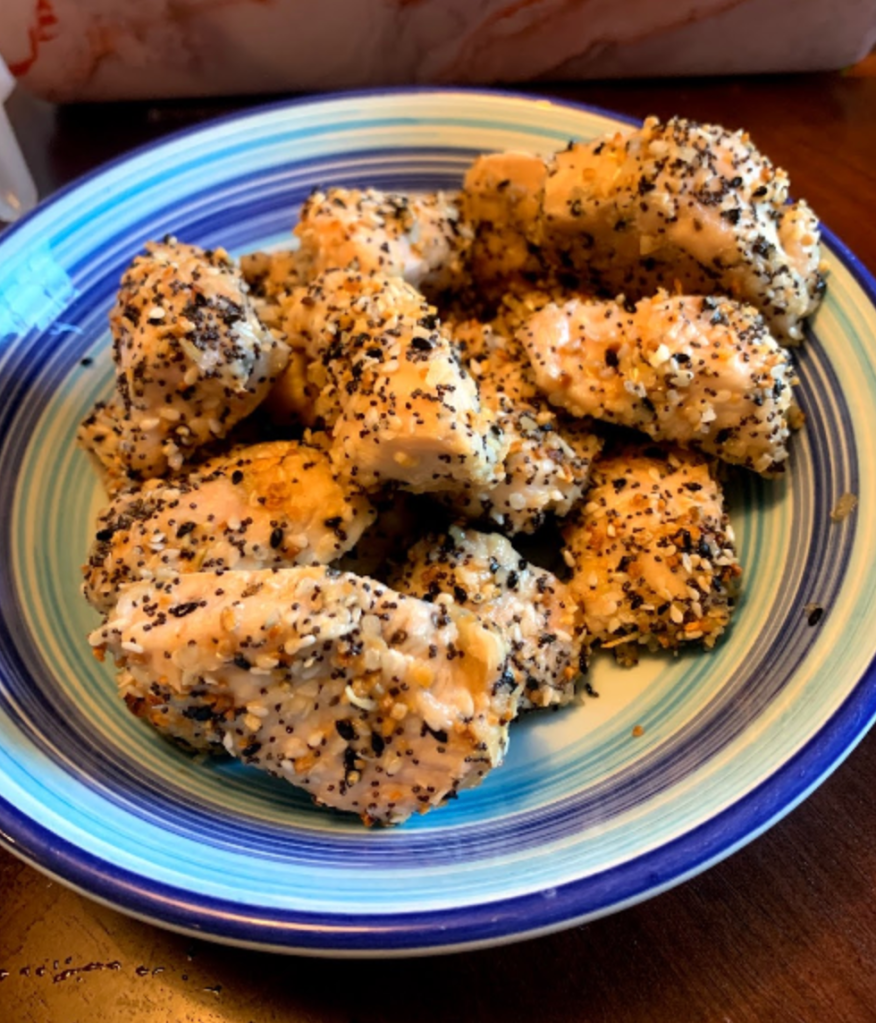
Everything Bagel Chicken Nuggets:
Luckily this recipe does not require a large number of ingredients. In order to make this meal, the ingredients you need are four chicken breasts, two sticks of salted butter, a large container of everything bagel seasoning, and salt for extra seasoning. As for the tools necessary for this meal, you will need a knife, large bowl, spoon, tong and a large baking pan. I like to use my Pyrex 9 x 13 pan for this meal because Pyrex is known for being able to withstand large amounts of heat, but any dish that is oven-friendly will do.
I have found that this recipe serves roughly six people and can be altered to make more or less chicken if needed.
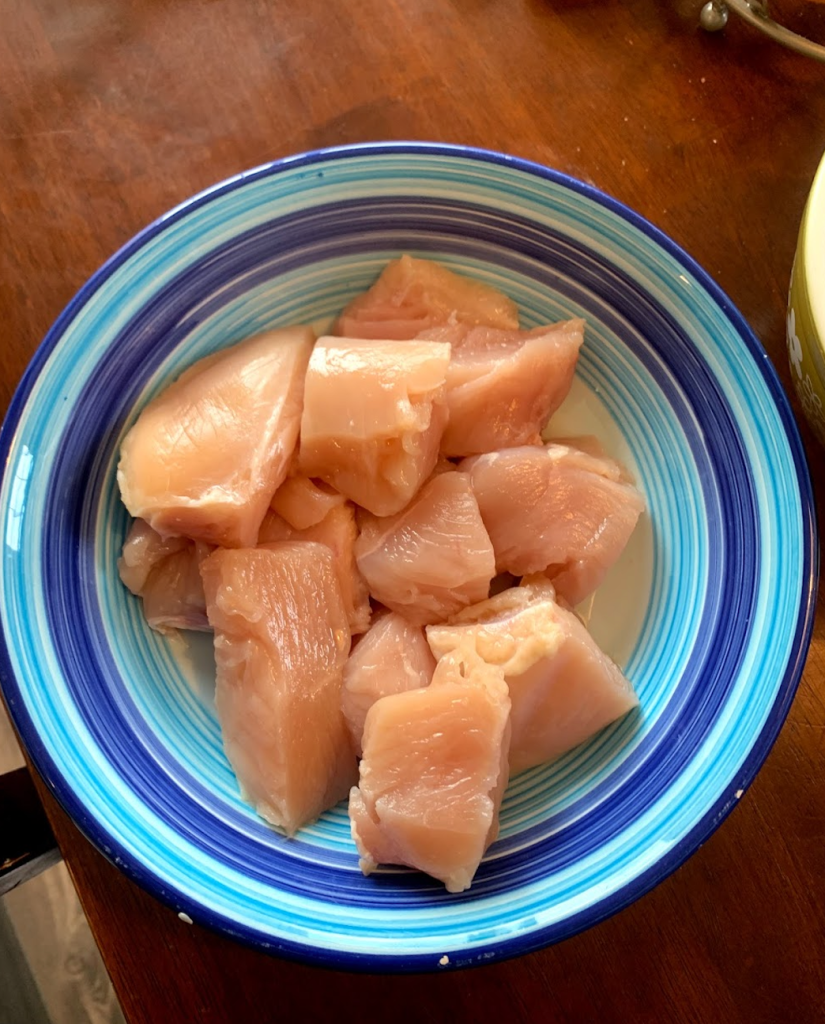
1. To start you will need to make sure your chicken breasts are thawed. If not, you can place them inside the microwave and put them under the appropriate de-frost setting. Once the chicken is fully thawed, you will begin cutting it into small pieces.
2. Using a knife, cut the chicken into small chunks, roughly the size of a nugget. Place the sliced pieces into a bowl.
3. Next, take the two sticks of butter and place them into a microwavable bowl. Heat the butter for 10-second increments until the sticks are fully melted, and the butter is completely liquid.
4. Dump half of the butter into the bowl with the chicken. Using your hands or a spoon, mix up the chicken ensuring that each piece is fully coated in the liquefied butter.
5. With tongs, place each piece of chicken in the bakeware. Using the everything bagel seasoning, coat each of the pieces of chicken with everything bagel seasoning. It is important that the chicken is fully covered, you can use the extra butter to help cover the pieces.
6. Once it is covered with seasoning, sprinkle a pinch of salt on the chicken for extra flavor.
7. Place the pan of chicken in the oven for 30 minutes at 400 degrees. Once the chicken is out, using a meat thermometer check to make sure it is at least 165 degrees. After the chicken has cooled, it is ready to be served.
These chicken nuggets are a great meal to make for gatherings because they are a type of finger-food and do not require extensive preparation. I have found that these nuggets go well with a variety of dipping sauces and can please even the pickiest of eaters. Some of my friends’ favorites include ranch, sour cream and blue cheese dressing. As it is inspired by the bagel, you could even use cream cheese on the chicken.
With this recipe for everything bagel chicken, you can think outside the box when making breakfast food for dinner and still have a savory textured meal.
Follow My Blog
Get new content delivered directly to your inbox.
